Plan materials and load the truck
A project’s materials move through a small lifecycle: someone plans them, a vendor ships them, they sit in the warehouse, a crew loads them onto a truck for a particular day, and sometimes some come back. Florio keeps that lifecycle on the Materials card of the event, hangs the pick list off the day the truck goes out, and counts cost on the project at the moment the crew confirms the load, because that is the moment somebody can actually see.
Before you start
Materials must be turned on for your workspace (Set up Projects). Planning lines needs the permission to plan materials; staging a day and confirming a load needs the permission to ship them, which the warehouse role holds. Unit costs and anything counted in dollars show only to people who can see project money.
Plan the lines
- Open the event’s Materials tab. The tab shows only on workspaces that plan materials, and its count chip carries how many lines have not arrived.
- Choose Add materials and fill in the form: the Item, the Quantity, the Unit cost, the Vendor and PO number when there is one, the Costing and the Status. Choose Create.
 Screenshot from a demo workspace; data illustrative.
Costing says how this line’s cost reaches the project, and it matters because one job normally mixes both:
- From our stock: the item comes off your own shelf, so its cost is counted on the project when it leaves the warehouse.
- On the vendor bill: the item was bought for this job, so its cost reaches the project when accounting codes the vendor’s bill to it. Nothing is counted here, so it is never counted twice.
- No cost to us: client-supplied or otherwise free.
Status starts at To order, On order or In hand. Once a line exists, its status, costing and staged day are edited in place on the table.
Read the table
 Screenshot from a demo workspace; data illustrative.
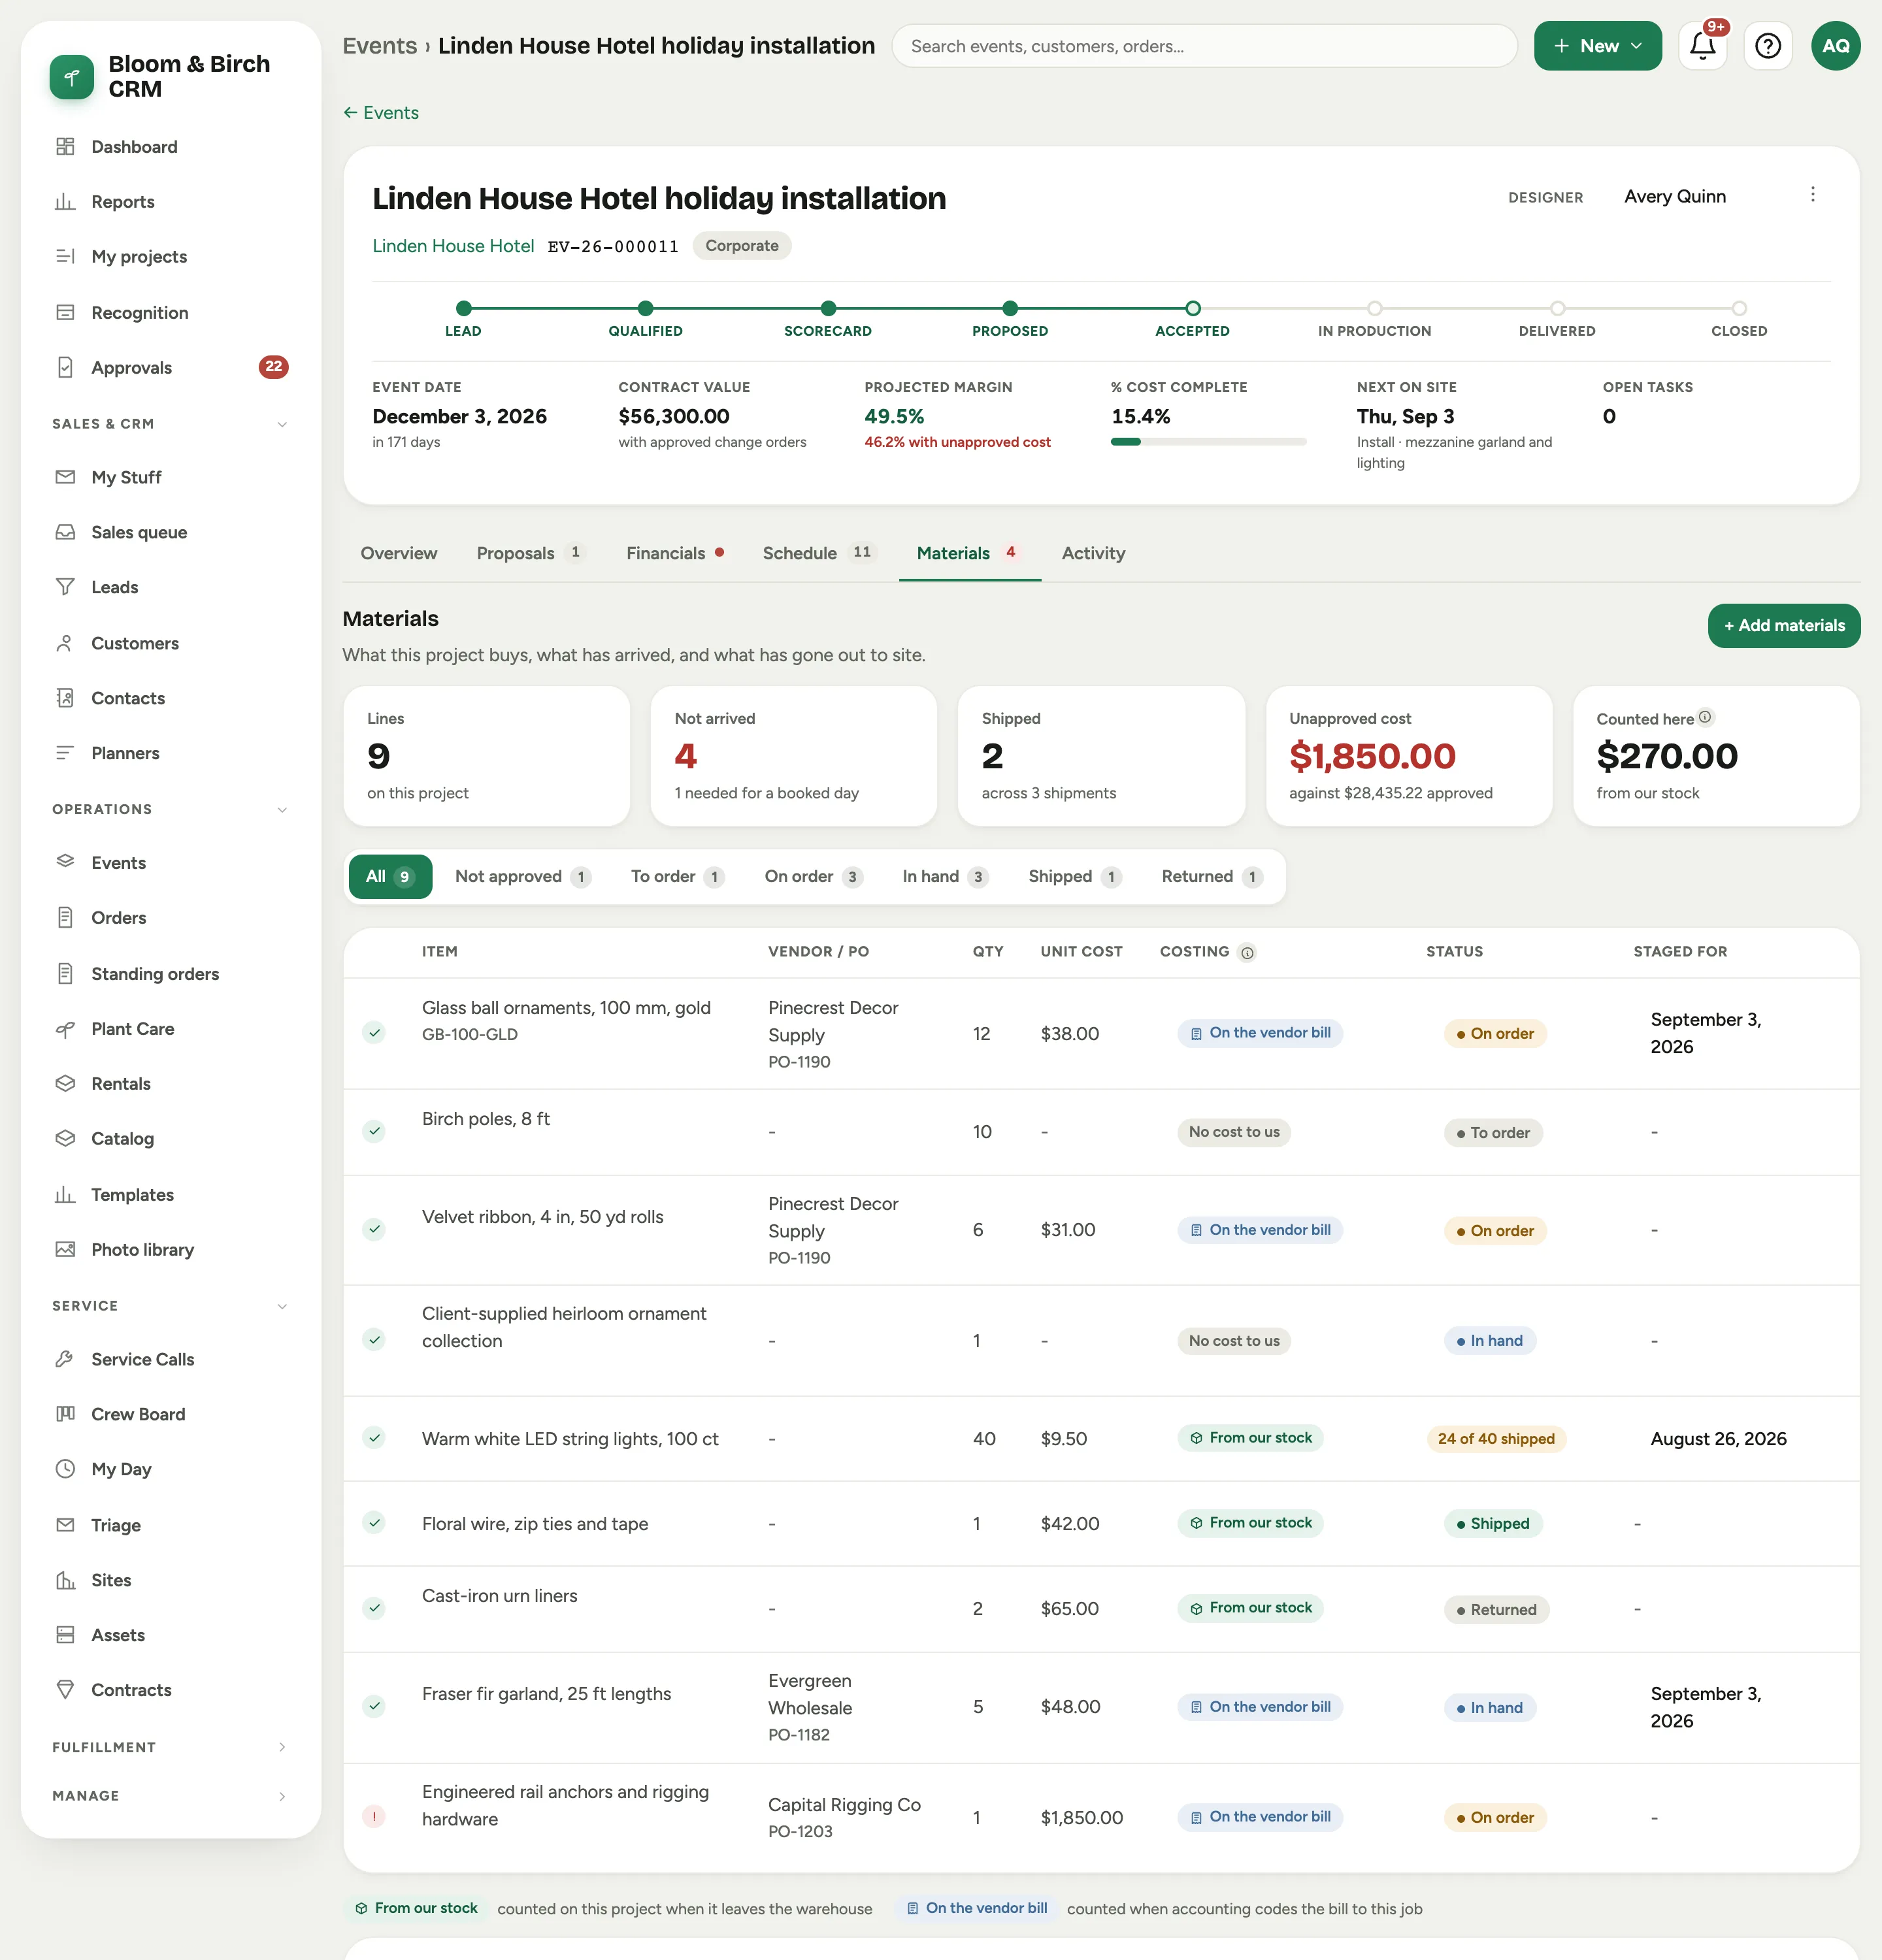
The stats across the top are the tab in one line: how many Lines, how many have Not arrived (and how many of those a booked day is waiting on), how many have Shipped across how many shipments, the Unapproved cost standing against the approved projected cost, and Counted here: the stock cost counted on this project so far. The chips filter by status: To order, On order, In hand, Shipped, Returned, and Not approved when any line needs an approval.
Each row leads with an approval mark beside the item, a green check when an approval covers the line, a red exclamation when one does not (hover it for Approved or Not approved; see Approve planned cost). Then come the item, its vendor and PO, quantity, unit cost, Costing, Status and Staged for, the day whose truck it is going on. A line that has shipped in part reads like “24 of 40 shipped” in place of a status.
Stage a day and load the truck
Every scheduled day on a project has a pick list: what goes on the truck that morning. There are two ways in.
- From the Materials tab, set a line’s Staged for to one of the project’s days. Only this project’s days are offered, and a shipped or returned line cannot be staged.
- From the schedule, open a day. The block editor carries a Pick list action, and a day that already has items staged shows a readiness chip that links straight to its list.
 Screenshot from a demo workspace; data illustrative.
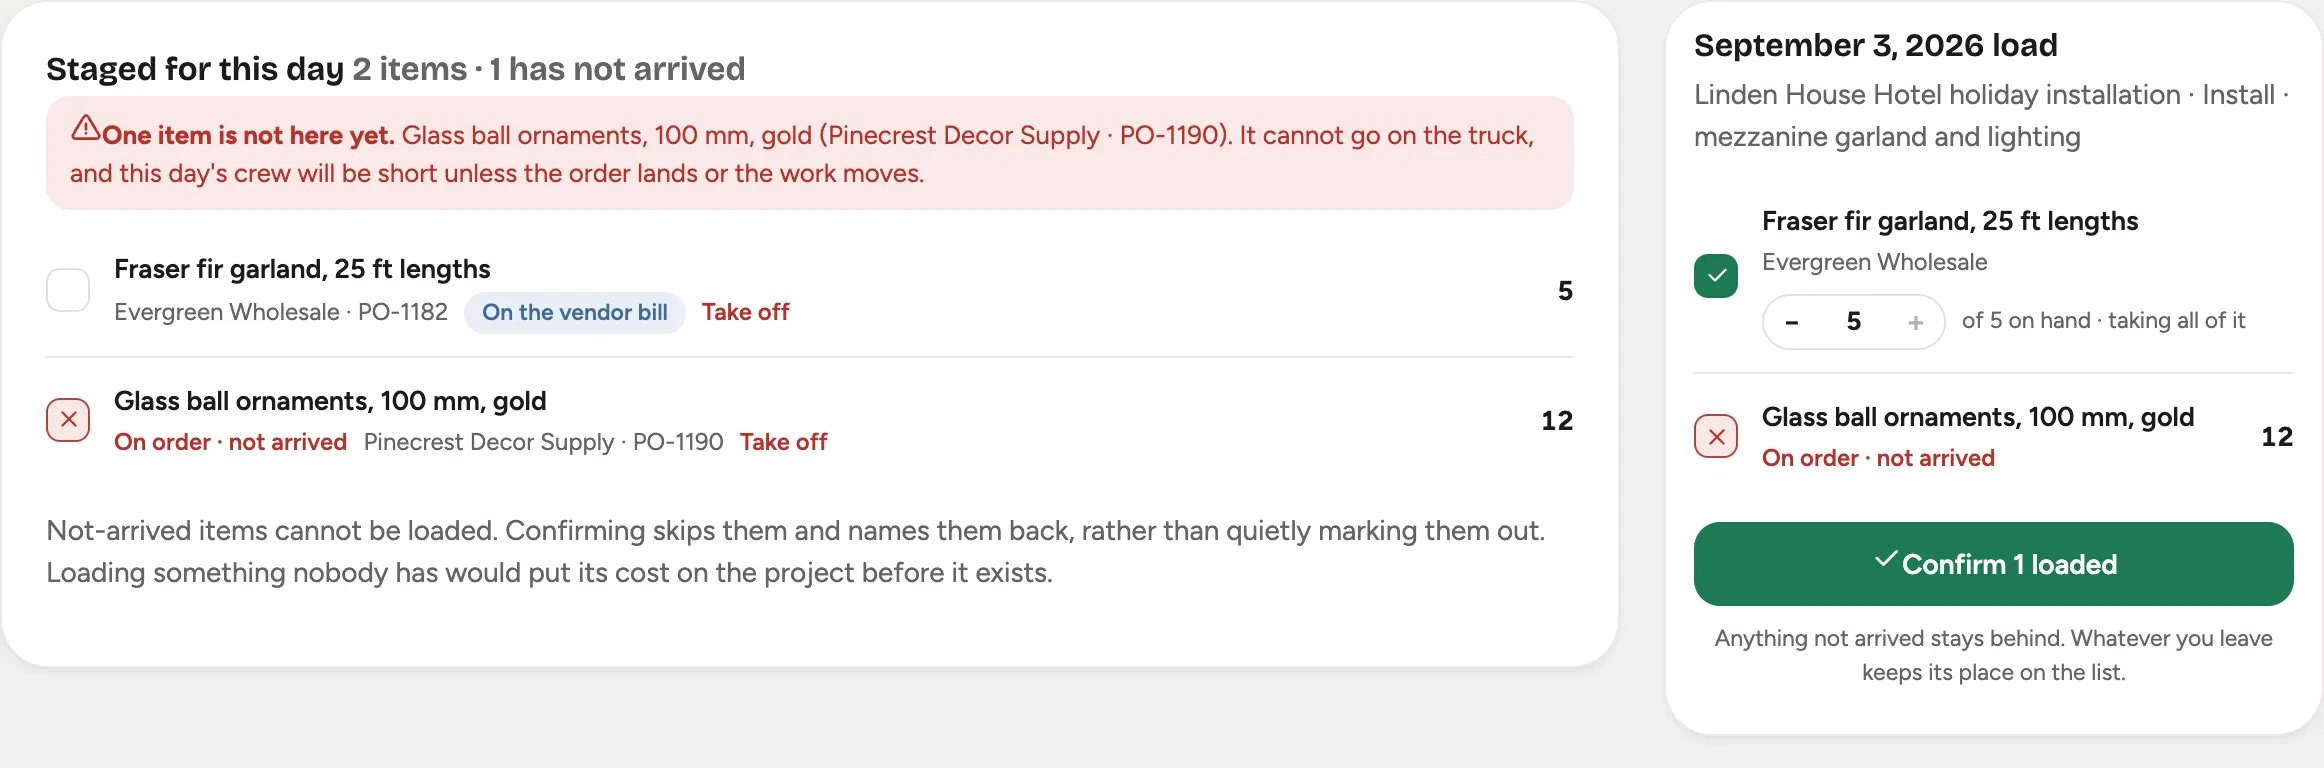
The left side is the warehouse view: Staged for this day, each line with its costing and vendor, and Stage items to add more from the project. An item that is still on order is refused and named in red: it cannot go on the truck, and the banner says the crew will be short unless the order lands or the work moves. Take off removes a line from the day without touching the line itself.
The right side is the crew’s load list, with no money on it. Each line has a quantity; when more than one is on hand, a stepper lets the crew take a Part load and leave the rest on the shelf. The confirm button, which counts the items as it goes, records what actually left:
- Each confirmed quantity ships. Its cost, if it is from your stock, lands on the project now.
- A part load keeps the line open for the balance, and the rest stays staged for the day.
- Anything not arrived stays behind, and the result names it back rather than marking it out.
- Confirming twice records nothing twice.
Returns and the shipments ledger
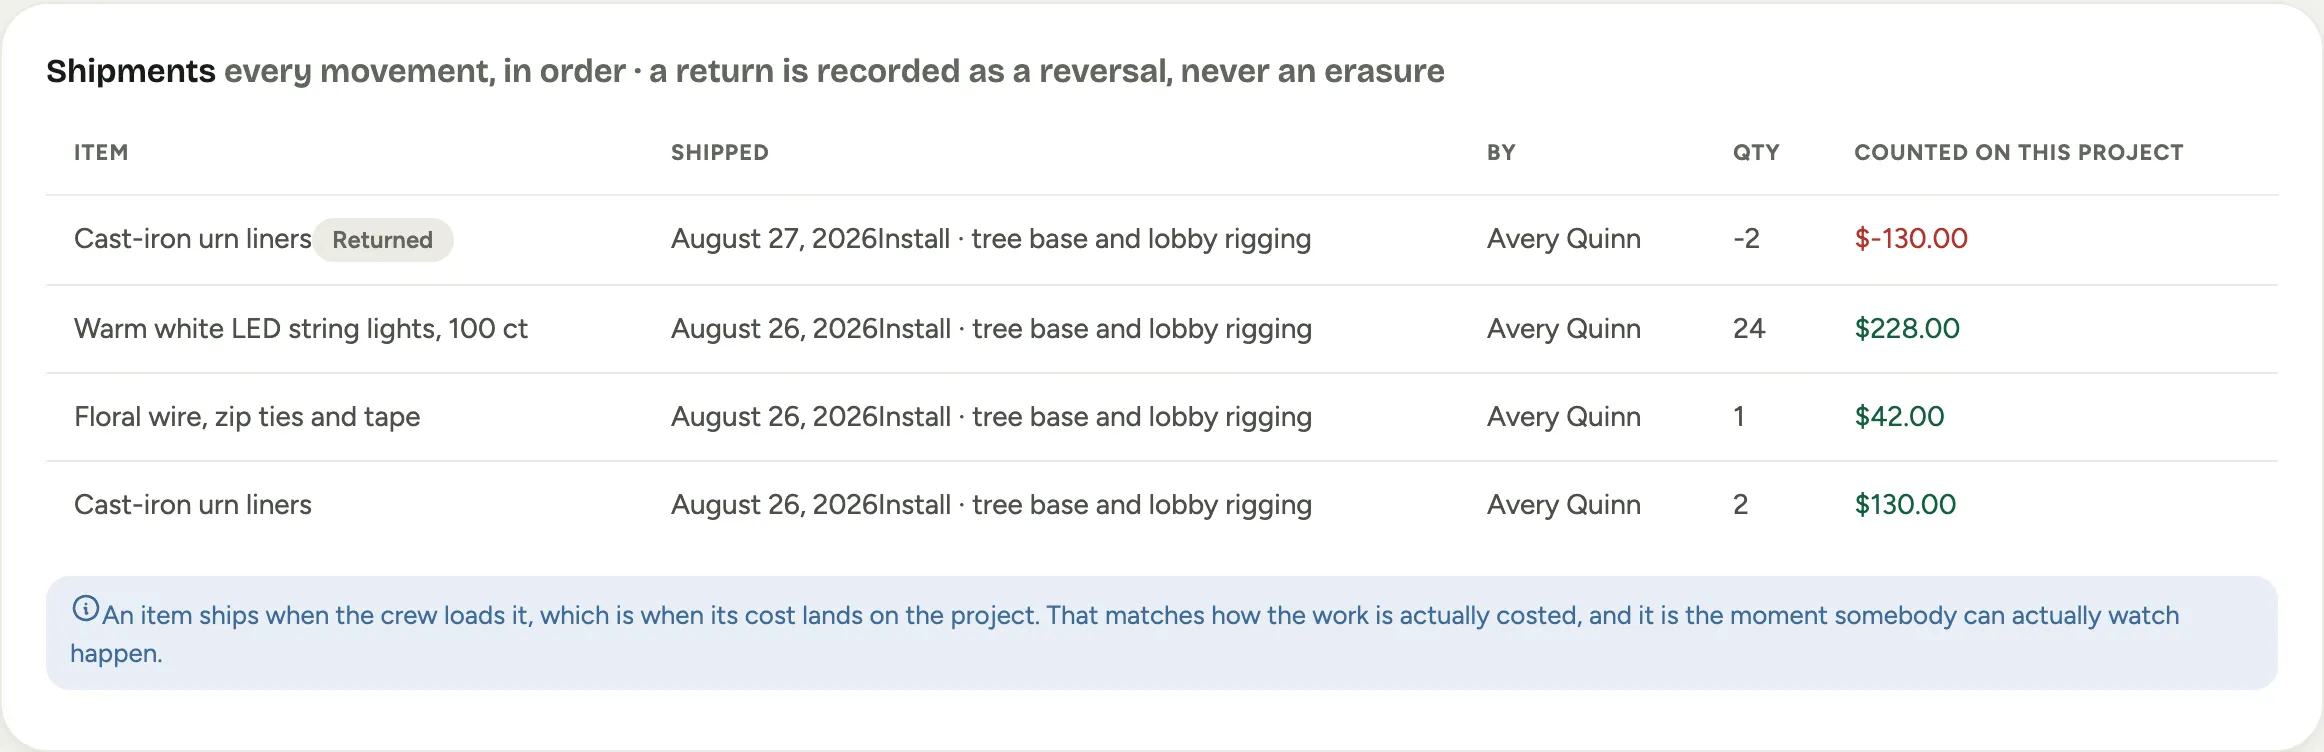
When something comes back, set the line’s Status to Returned on the materials card. The Shipments ledger under the table records every movement in order, and a return appears as a negative line against the shipment it reverses, never as an erasure. The same ledger shows a part shipment as its own row.
 Screenshot from a demo workspace; data illustrative.
Phases
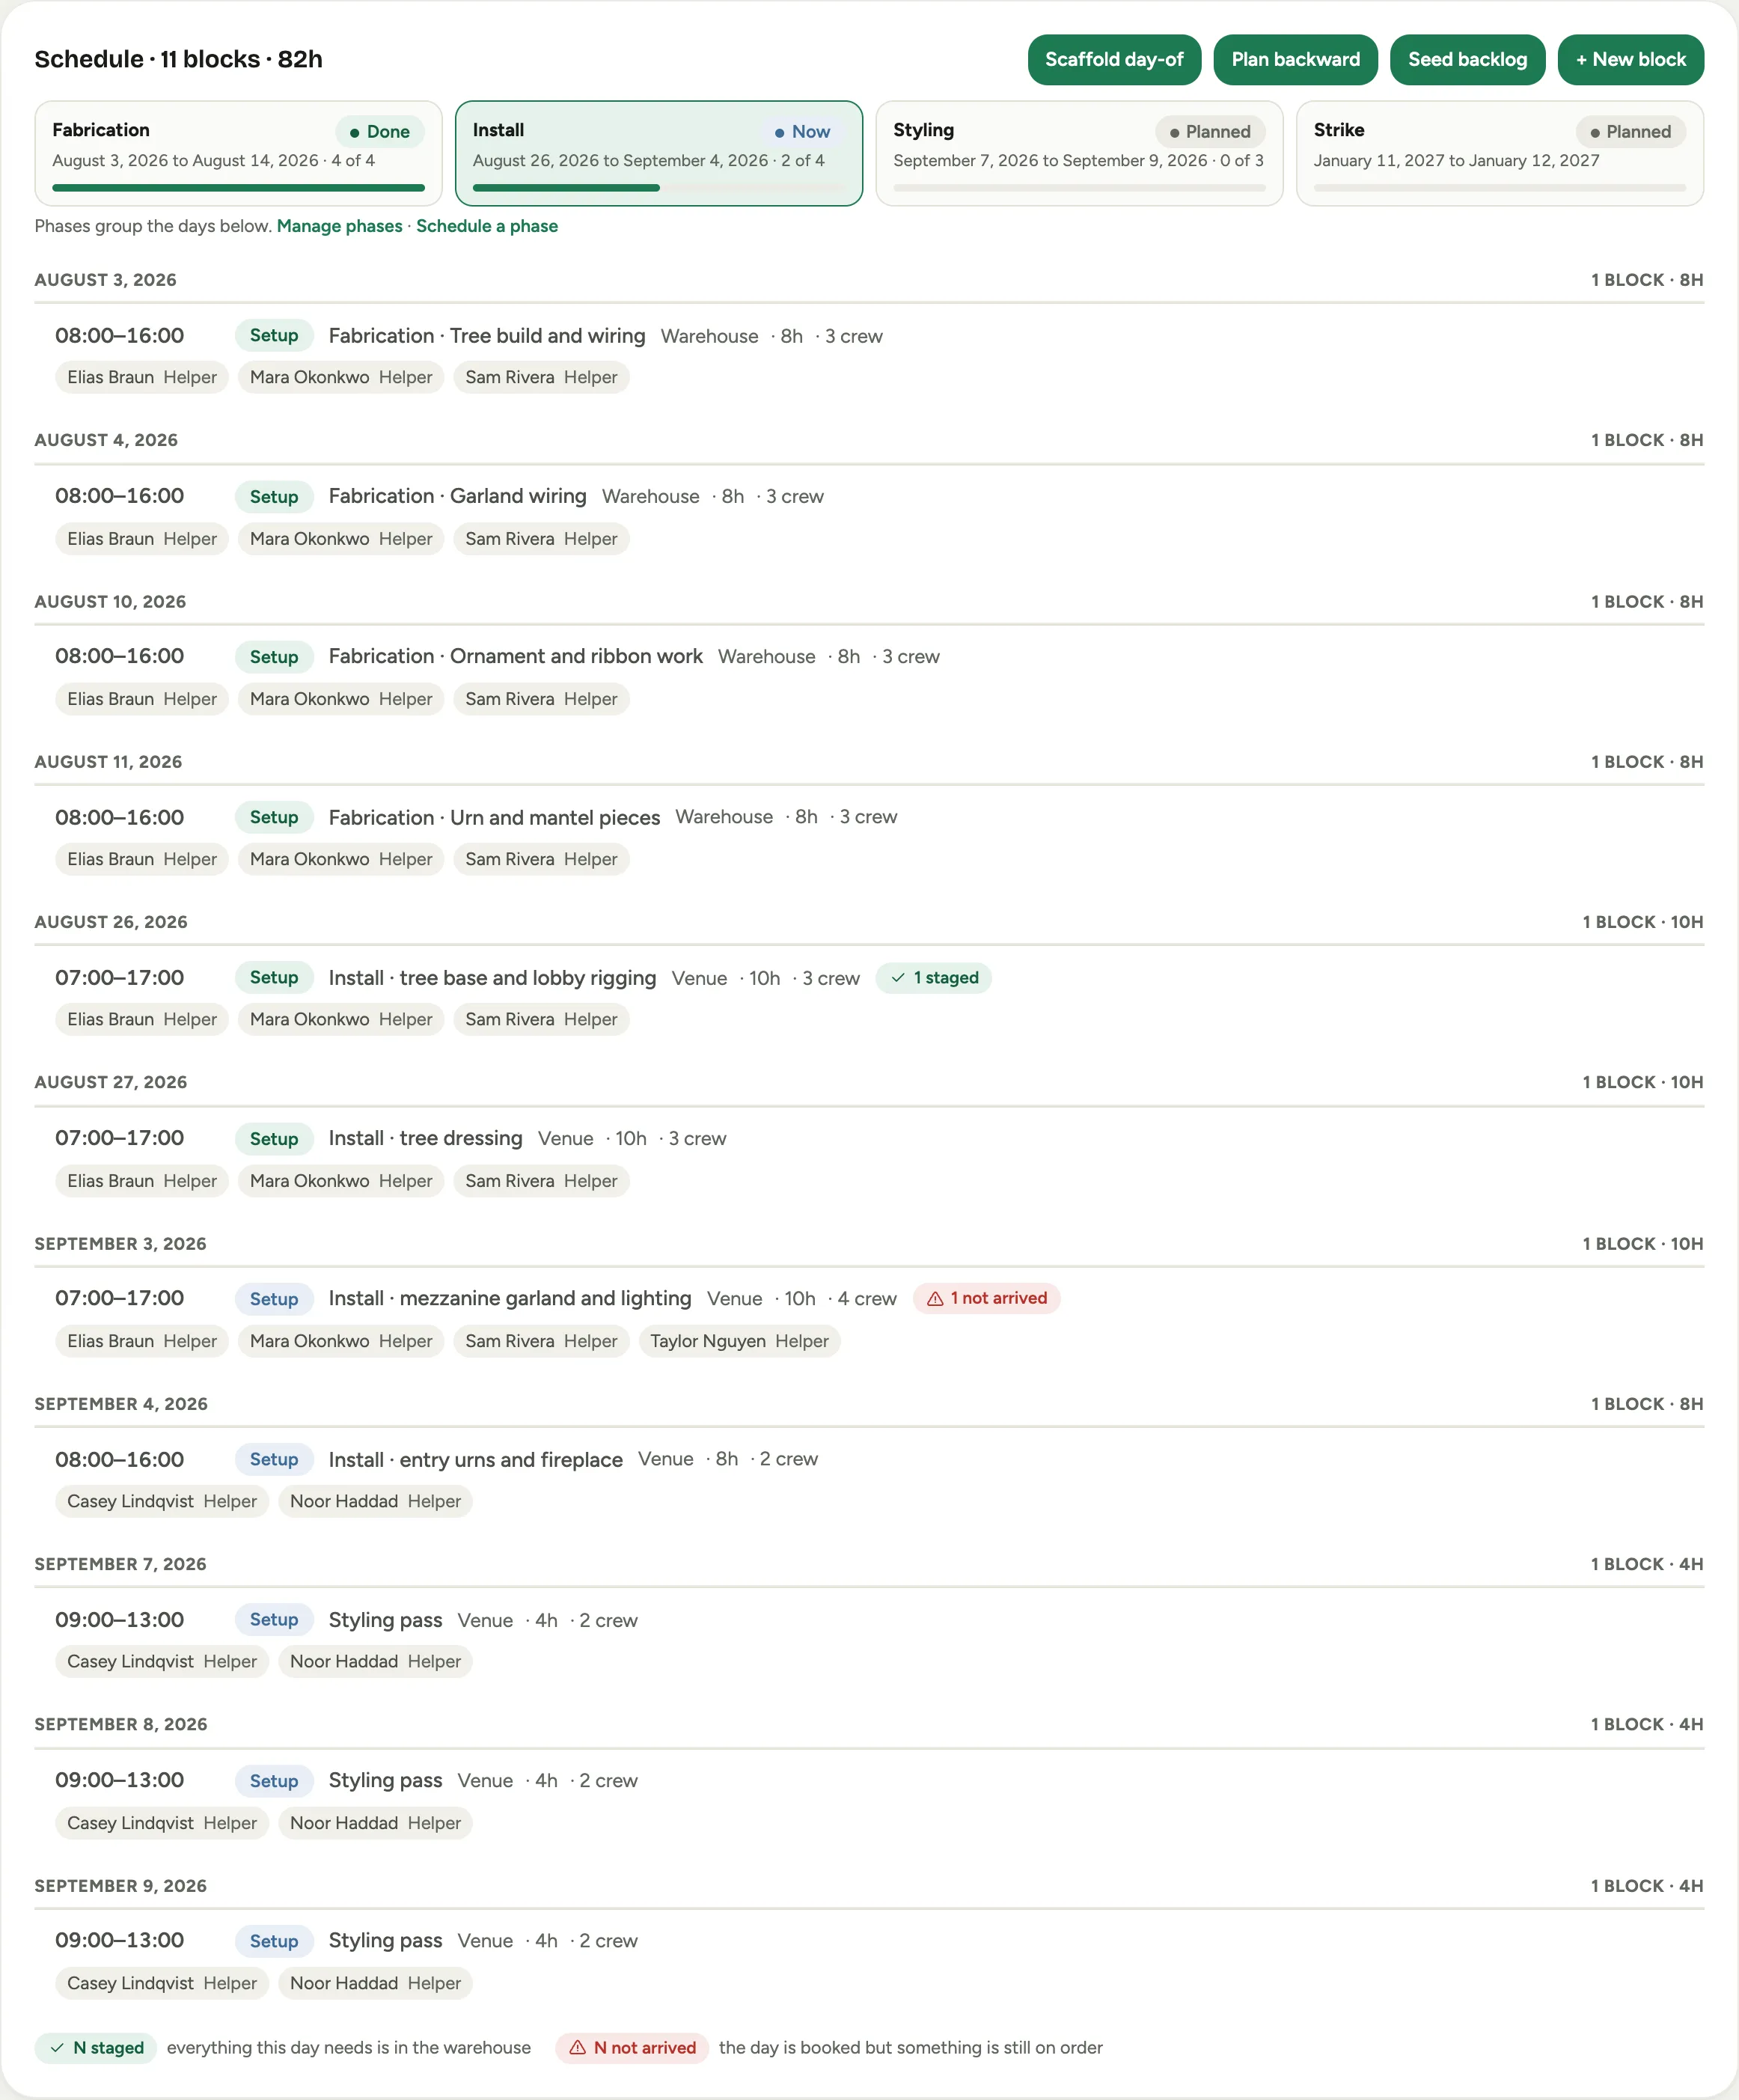
A project’s days group into phases on the Schedule panel: Manage phases adds, renames and dates them, with a status of Planned, Now or complete. The strip above the days shows each phase’s planned window, how many of its days are done, and a state:
- Planned: not started.
- Now: active, with days still to come.
- Wrapping: active, every scheduled day done.
- Done: marked complete.
- Late: a day is booked past the phase’s planned end, whatever its status says.
 Screenshot from a demo workspace; data illustrative.
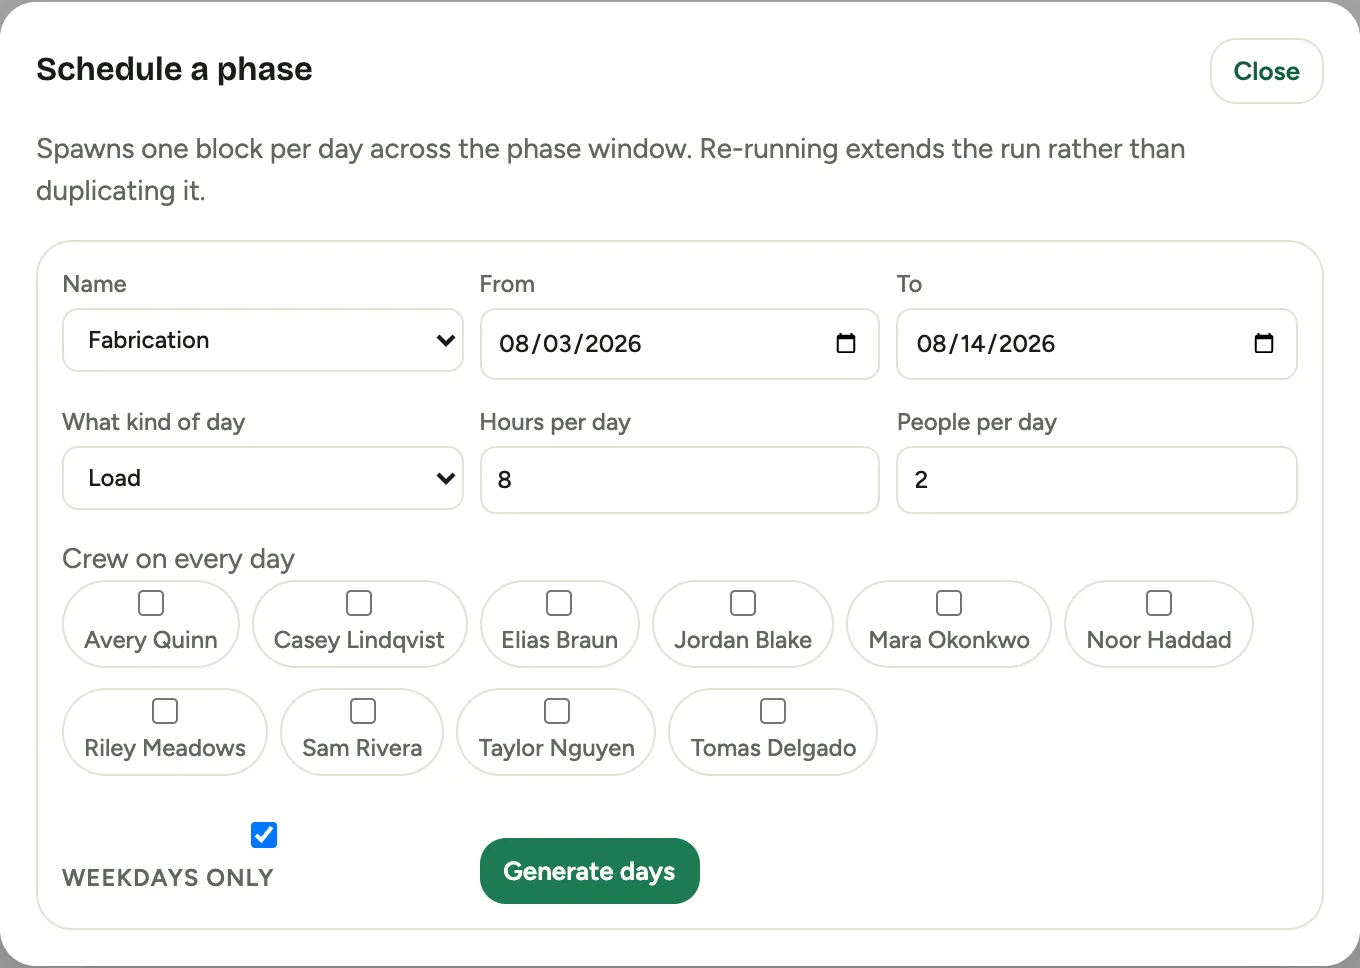
Schedule a phase generates the days: pick the phase, keep or change the From and To dates (they default to the phase window), choose What kind of day, Hours per day, People per day, the Crew on every day, and whether to keep Weekdays only. Then Generate days. Running it again extends the run rather than duplicating it, and a day you add by hand can join a phase from the block editor.
 Screenshot from a demo workspace; data illustrative.
Deleting a phase leaves its days on the calendar; they stop rolling up to a phase.
My projects, every morning
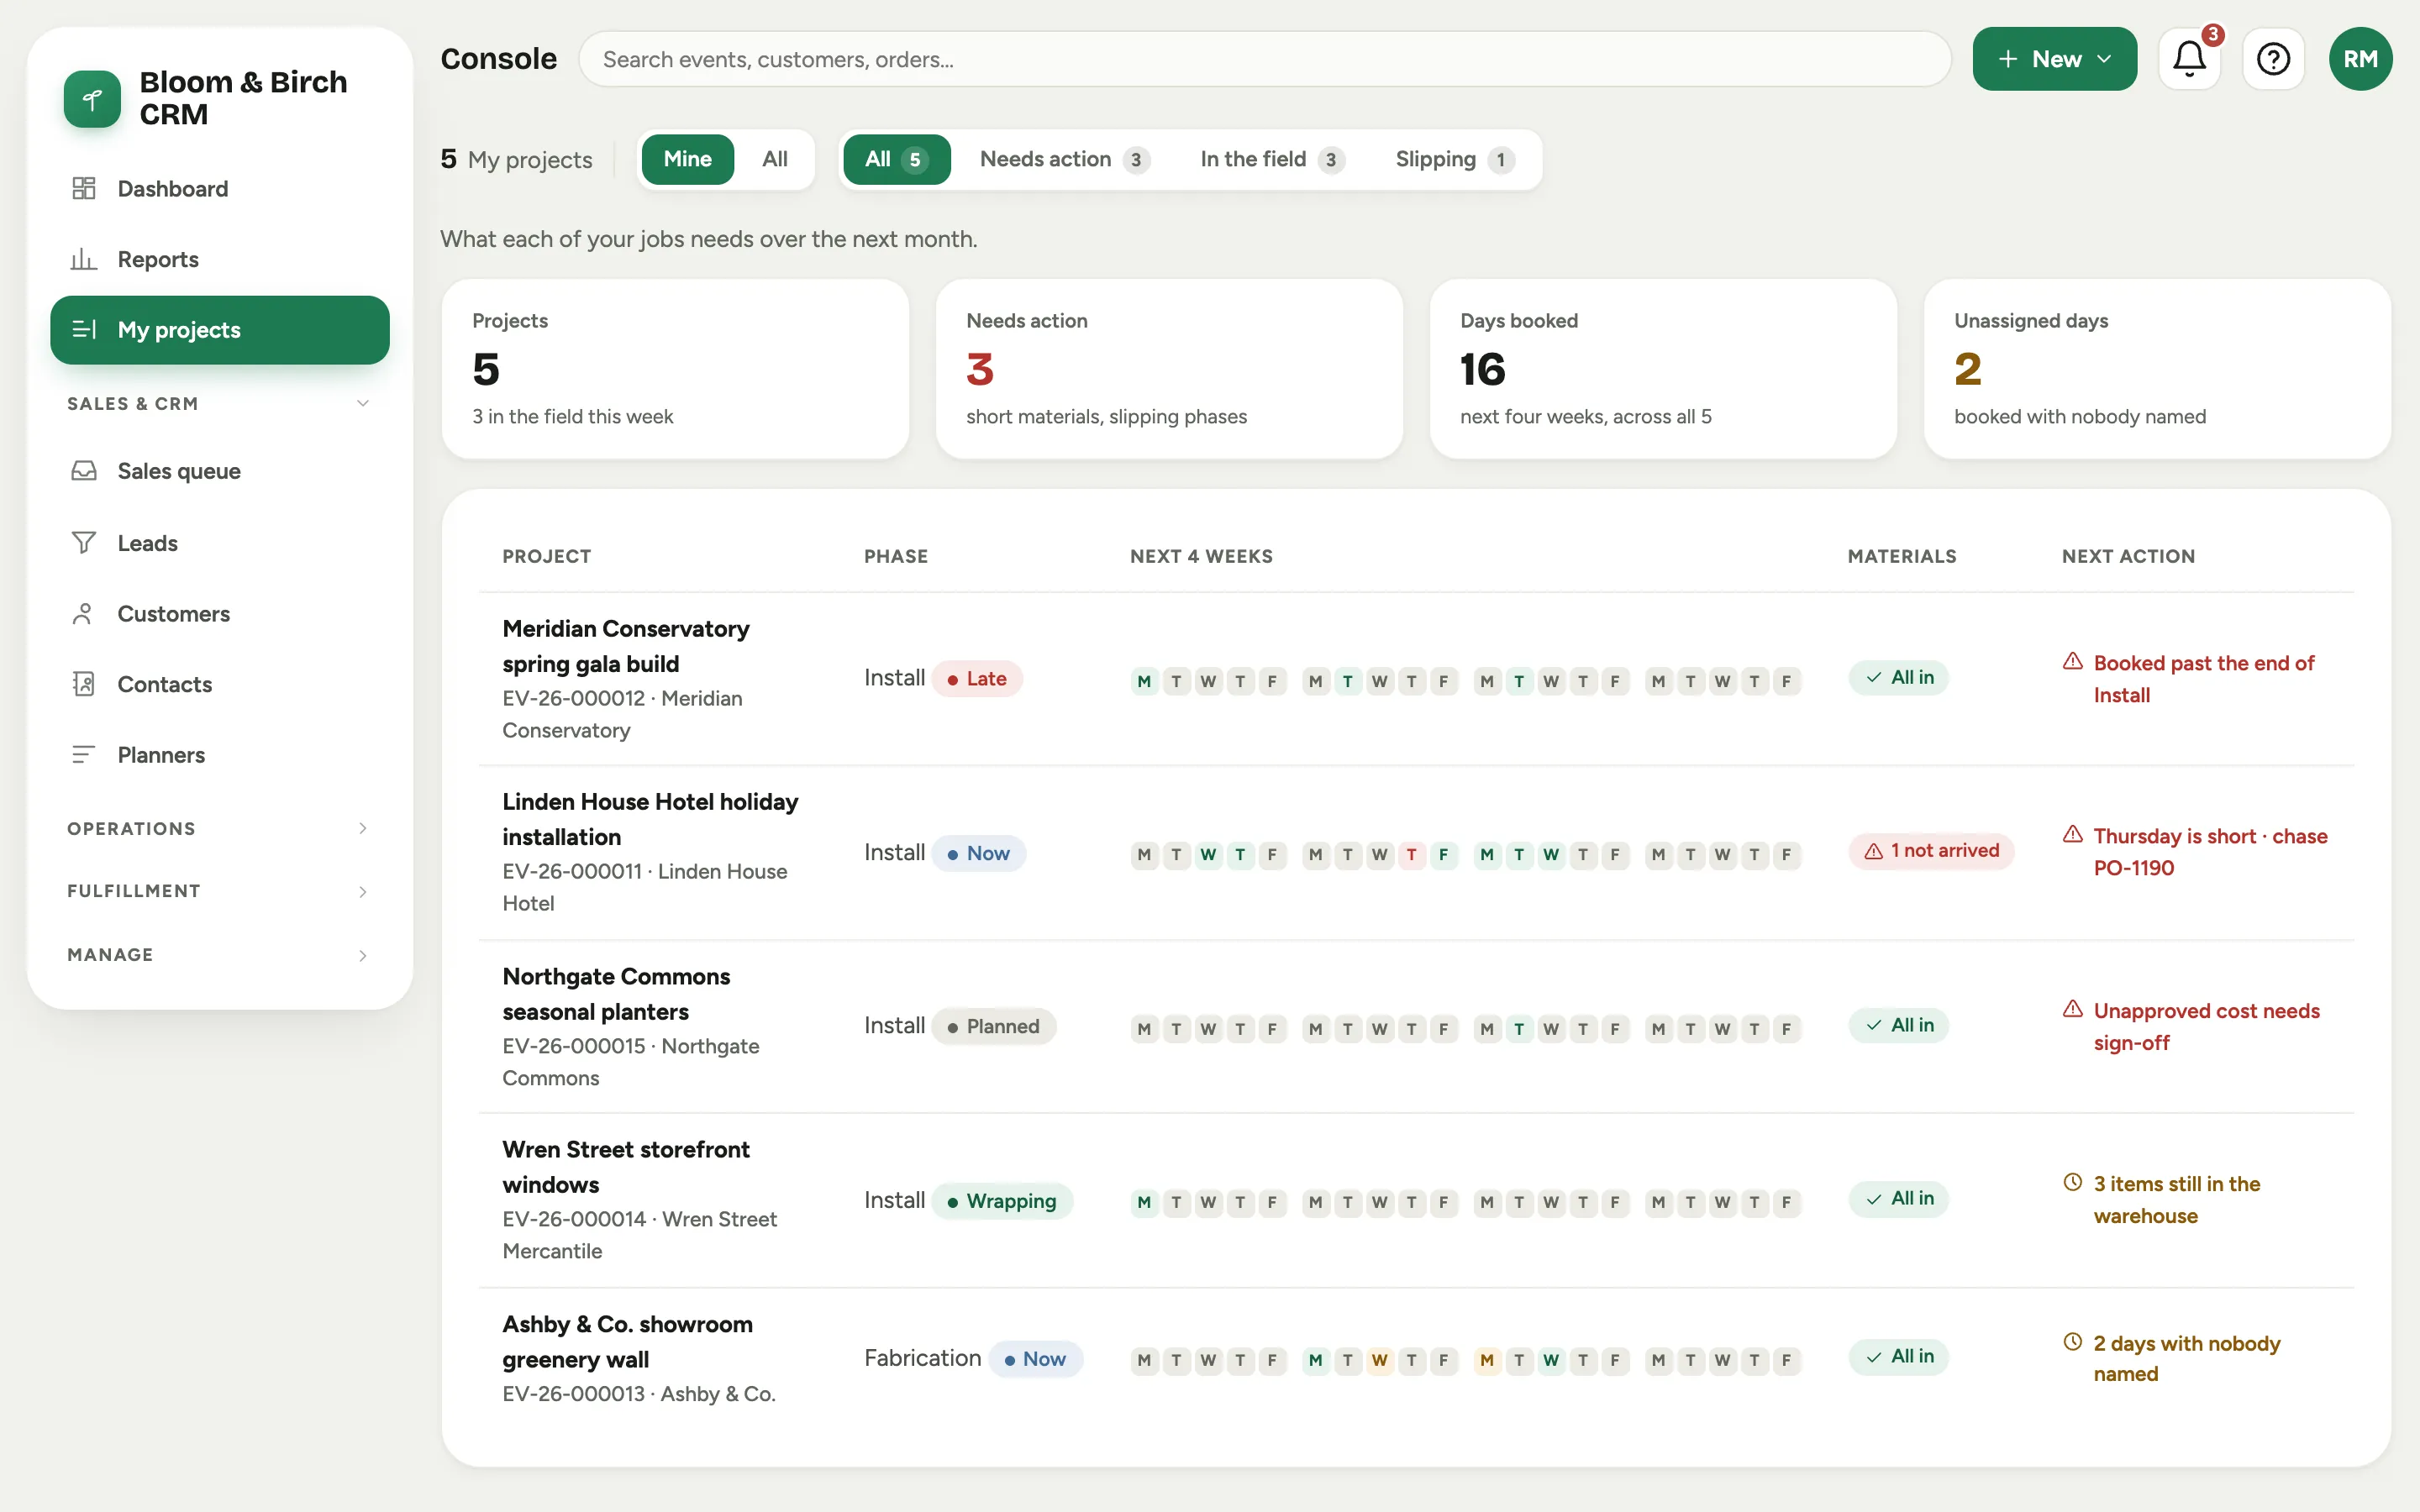
My projects in the sidebar brings the above together across every job you own: the current phase and its state, the next four weeks as day dots (booked, at risk because something has not arrived, or booked with nobody named), materials readiness, and a Next action in plain words. Rows sort by urgency, and the chips narrow to Needs action, In the field or Slipping. Switch the scope from Mine to All to see every project.
 Screenshot from a demo workspace; data illustrative.
Good to know
- A line can be removed while nothing has shipped from it. Once something has, the honest reverse is a return.
- Materials lines add to the project’s unapproved cost until a re-estimate covers them; see Approve planned cost.
- The warehouse role sees what to load and never what it cost. The crew’s load column carries no money for everyone.